|
License & Registration
Honeycam License PolicyHow to register Honeycam Get your product key again Honeycam Edition Comparison Refund Policy How to unregister Honeycam Buy more licenses Features & Technical Terms
GIF, WebP, AVIF and WebM formatsAPNG format Quantization FPS (Frames Per Second) How to reduce GIF file size Transition effects Use Dither Maximum recording time Use Disk Swap Use DXGI Save as MP4 Directly Help about Editing
How to insert/edit/animate textsHow to insert/edit/animate speech bubbles How to insert/edit/animate stickers How to use the photo frame effects How to draw on animated images/videos Tips for Honeycam
How to maintain the quality of images when re-saving as GIFSave as the working(current) file name after editing Hotkeys for Honeycam Save all settings Troubleshooting
Online Authentication FailedEntry Point Not Found How to update Honeycam How to run Honeycam as administrator WebP doesn't play smoothly on iPhone! How to install AV1 codec for free How to troubleshoot when Honeycam is shut down for no reason in a few seconds after its execution Honeycam crashes when opening a video When saved as GIF, the playback time is not the same. When saving GIFs, the CPU usage is too high. |
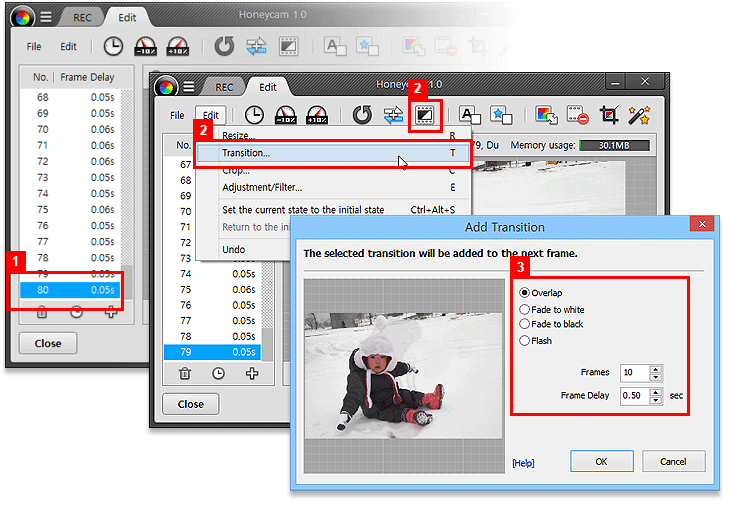
Transition effectsHoneycam provides a Transition feature that makes your animated file repeat (loop) more naturally by adding an effect of a connection between the last frame and the first frame of the animation.
How to add transition
Transition settingsYou may adjust the frame settings to create the transition with the speed and the impression you want. Remember though, that more frames lead to larger file size. Assigning too many frames to the transition makes your file too large and unfit for its purpose. Transition frames
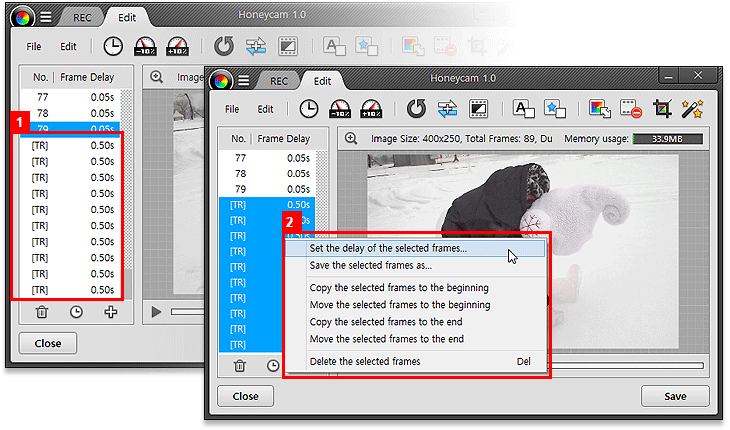
Frame multi-selectionYou may select multiple transition frames as follows: select the first [TR] frame, and then hold down the Shift key and select the last [TR] frame. With the Multi-selection, you may adjust the frame delays or delete the frames all together. |
||||||||


